Search This Blog

Sunday, August 5, 2018

Chocolate Chipotle Paletas


If you know me at all you are likely aware I am a choc-oholic!  Deep dark chocolate anything makes my tastebuds sing a song of yumminess!  You know that one, right?? 🎤  I have made Chocolate Chill-potle Paletas many times, but recently realized, after I was asked for it, I never shared the recipe.  And sharing is important and fun!  So here is one of my favorite paleta recipes:

6 oz. bittersweet chocolate (I prefer 72%)
2 T dark brown sugar
1/2 teaspoon cinnamon
1/4 teaspoon chipotle chili powder (adjust to taste)
2 cups half and half (you may substitute cream or any % milk preferred)

Warm chocolate, sugar and half and half over low heat just until chocolate melts.  Mix in cinnamon and chipotle chili powder.  Cool in refrigerator, pour into molds and freeze 6 hours or overnight.  Enjoy chocolate lusciousness!


Chocolate Chill-Potle Paletas

Thursday, April 28, 2016

Spring Spruce


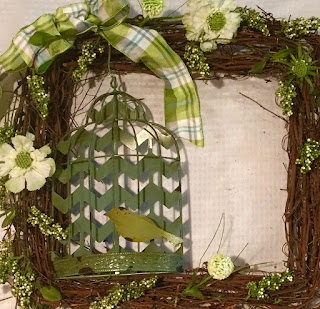
Have you ever experienced a need to spruce?  At our house, the last few months have added two remodeled baths and the best fix up of all: a new daughter-in-love!  But, once a desire for a new environment begins, it may be difficult to know where to end.  Last summer a tiny mama bird made her own little nest in my mesh wreath, and though I was more than happy to help hatch her babies, it left my old wreath unusable. So, I spent today making a sweet spring wreath.  The only thing I found challenging in making my door decor was choosing among all the pretty things!  They must be coordinated and edited, but oh, it is sad to leave items unpurchased at the hobby store!

After spending almost an hour making choices, and finding to my delight, that everything was 50% off (so why not buy twice as much!?!), I started with a gorgeous plaid ribbon featuring warm greens, white and turquoise blue with a touch of gray.  I prefer wired ribbon since it is will hold a bendy shape.  Once I found the ribbon, it was easy to spy coordinating flowers, berries and the featured item for the wreath: a whimsical metal cage complete with a little songbird.  I had decided on a square wreath before the shopping trip.

If you would like to spruce for spring too, here are the tools and steps:

Assemble your purchased items for the wreath, a pair of sharp scissors, a glue gun, some floral wire and craft/jewelry wire cutters.


Spend some time placing your chosen pieces on the wreath.  It may take a few different placements before it strikes your eye as pleasing!


Once you like the way your wreath looks, snip your floral wire to secure the larger pieces and use the glue gun to tack down any loose ends.  Give it a good shake to be certain nothing falls off!


This time, I made a fabric "hanger" for the wreath from the plaid ribbon and some blue burlap to add a bit of color.  I placed it on my over-the-door hook, and now, my spring spruce is ceased!


Tuesday, October 20, 2015

Sea Salt Caramel Rolled Cookies


In the last year or so, sea salt caramel-flavored desserts have exploded on the culinary scene.  Being a huge fan of exploding caramel, I decided to find a sea salt caramel rolled cookie recipe.  After all, cookies are my bread and butter and I'd already made all the caramel paletas and artisan candies my family's tummies could hold!  Though I Googled high and Googled low, I didn't find a single caramel rolled cookie recipe. It seemed the only solution was to develop my own.  

Being a reasonable and experienced cookier, I knew where to find the most delicious sugar cookie recipe.  I immediately turned to LilaLoa's blog because her recipes are unbeatable.  Actually you should beat the dough to make your cookies turn out right, but I think you know what I mean.  I was looking for LilaLoa's Super Amazing Vanilla 2.0 recipe found here.   I added the "super amazing," because it is, and LilaLoa is much too humble to say it herself, though everyone thinks so!

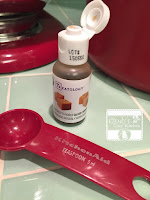
All I needed was a tiny tweak to the recipe and a super saturated caramel flavoring!  I bought every itty bitty bottle of the new Wilton Treatology Salted Caramel I could find locally.  #yeahthatwasme   #sorrynotsorryeasttexaspeeps   It turned out to be just right!


Whee!!!  I was set for a delicious experience armed with, don't forget, a super amazing recipe!  The following is LilaLoa's Vanilla 2.0 recipe with my tweaks in italics.  It's almost the same, y'all, with the exception of browned butter, adding a bit of milk, and slight changes to the salt and flavorings!


Sea Salt Caramel Rolled Cookies
1 cup browned butter
2 tablespoons milk
1/2 cup brown sugar
1 cup granulated white sugar
2 extra large eggs
1 teaspoon vanilla
1 teaspoon Wilton Treatology Salted Caramel flavoring
1/4 teaspoon table salt
1/4 teaspoon baking powder
1/4 teaspoon ground sea salt
4 (or 4 1/2) cups flour


Brown 1 cup of butter (You can find a tutorial here.) Allow browned butter to cool to room temperature and add 2 tablespoons of milk to the pan to replace lost liquid.  Cream the browned butter and both sugars together.  If you have any brown sugar lumps, you should crush them up or pull them out.  They make weird dents in your baked cookies.  Add the eggs and the vanilla and caramel flavoring, mix thoroughly.  Add both types of salt and baking powder and mix the dough again.


Before you add the flour, let's have a little chat.  Different altitudes and humidity levels change the amount of flour you should add.  Add only 3 cups to begin with.  Then add additional flour 1/2 cup at a time until the dough is no longer sticky and holds together.  (This happens at about 4 cups of flour for me...except in the winter when it happens at 3 31/2 cups of flour.)  Roll dough and cut cookie shapes.  Freeze for 5 minutes or so, if you wish, before baking.   


Bake at 350F.  If you roll to 3/16" thick, bake for about 7 minutes.  If you roll to 1/4" thick, bake for about 9-10 minutes.


Did you try it???  Was it a caramel explosion of goodness in your tummy?  Let me know what you think, and be sure to hop over to thank the super amazing LilaLoa for the brilliance of her recipe and her generosity to the cookie community and the world beyond!  Many thanks to my darling friend Paula at Dear Sweet Cookies who worked alongside me baking and decorating these adorable Halloween cookies, contributing her talent and sweet styling.  Uber cute Halloween Stack cookie cutter created by the ever awesome Ronee at That's a Nice Cookie Cutter.  I'll always appreciate a link and shout out on Instagram and Facebook if you use this recipe!


Monday, April 6, 2015

Cookie and Clipart Collaboration

It is my thrill to share that I will be working with Jessica Weible of JW Illustrations to "cookie" (yes, I use it as a verb) some of her art!  Her adorable clipart collections, printables, fonts, digi stamps and papers bring a smile to my face, and I couldn't be happier for this opportunity.  She has been a sweetheart to work with, both kind and supportive.  And if she wasn't nice enough, she also has a weekly freebie on her site.  Isn't that generous?

Be sure to check out her blog as well!  It is full of ideas for party themes, delicious recipes, tutorials and even those freebies!  Jessica has it going on, y'all!

If you have a special set of cookies, a fun party, or some pages to scrapbook, hop on by and load up your cart with the cutest art around.  This is not to be missed!

Here is my first set of cookies using Jessica's Stick Figure Bunnies Clipart:


Thanks again, Jessica, for this opportunity to bring your art to life in cookie form!

Tuesday, October 7, 2014

Go Bo! Cookies for a Cause

"Love each other, help each other, have your neighbor's back. If you see someone in need — even a stranger — reach out and help. The world can be a better place if we care and help each other."  -Bo Johnson, age 12

What wise words from a young man I wish I could have met!  I have a feeling we would have been kindred spirits.  Since I wasn't fortunate enough to know Bo, I do what I can to bring his message to others.  I made two sets of cookies for the Go Bo! Foundation Bake Sale, located in Door County, Wisconsin.

I chose cute cookie designs that were Halloween worthy, but not scary, as I had young children in mind.  I imagine their faces light up with shining eyes and big smiles when spotting their favorites out of thousands of cookies!  I am thrilled to make this small contribution to the sale to fund research on cancer and other related blood disorders, while sharing Bo's thoughts on life.  Please read Bo's story below, and follow this link Go Bo! Bake Sale Foundation to see many, many cookie artists from all around the world come together, led by Jill of Jill FCS.


Bo Johnson was diagnosed with a rare form of Leukemia, EM/AML, at the age of 12. He valiantly fought the disease, but lost the battle on September 28, 2012. Bo’s story does not end there, though. Bo had a mission, his message was simple ...


"Love each other, help each other, have your neighbor's back. If you see someone in need — even a stranger — reach out and help. The world can be a better place if we care and help each other."

The Go Bo! Foundation brings hope to children with life-threatening medical conditions by funding research, supporting treatment, and helping their families during times of financial need. The Go Bo! Foundation is Bo's gift to us. It's a way for each of us to use our talent to give back. It’s a community of people gathering together with a single mindset ... paying it forward.


Love and sweetness to all from Cindy's Cozy Kitchen!
#gobo

Friday, September 26, 2014

 Ginger Bubble  Tea 

Ginger Bubble Tea Ingredients


Fresh Ginger, Lemon, Rosemary
Boba tea is my latest obsession, but if you live in a small town, it is a rare find in a shop or restaurant.  After trying it several times on vacation, I decided to make it at home.   This tea delivers a refreshing drink and a satisfying snack to chew all in one tasty package!  Also know as "bubble tea" the boba or bubbles are large, black tapioca pearls.  They can be found in Asian markets or ordered online, which is my only option. Order boba here or use a search engine to find other options.  **Link is not promotional in nature.  **Boba tea not recommended for young children as it may present a choking hazard.  


Allow to Cool
To prepare 2 servings of Tea you will need: 
12 thin slices of fresh ginger 2-3" long 
1/2 teaspoon lemon zest
1 small sprig of fresh rosemary
2 cups cold water
Bring all ingredients to a boil, turn down to a simmer for 20 minutes.  Allow to cool.  Strain solids from tea and refrigerate.
**OR**
Prepare 2 bags commercially produced ginger tea, available in most grocery or health food stores, according to directions on box. This will make a more strongly-flavored ginger tea.

To prepare Boba:
1/2 cup dry boba
4 cups water
Bring to a boil, reduce to simmer for 20-25 minutes achieving a chewy consistency. Strain out water and drop boba into Simple Syrup, cool.

To prepare Simple Syrup:
1/2 cup of sugar
1 1/2 cup water
Warm water on stovetop, stir in sugar until completely dissolved, cool.

To assemble Bubble Tea:
Add 1/2 of the prepared boba to the bottom of a pretty glass.  Be sure to scoop in some Simple Syrup, as it is the sweetener.  Pour in 1/2 cup ginger tea and 1/2 cup milk.  I prefer using skim milk, but a higher fat content will result in a creamier tea.  Add a "fat straw" to your glass, find a relaxing spot to  sip and chew your way to bubble happiness!  ***Note: boba only hold for a few hours and will begin to lose consistency, turning dry even when held in syrup. 


Boil Boba for 20-25 Minutes for Chewy Consistency
Boil Boba in 4 cups Water for 1/2 cup Boba
Prepare Simple Syrup to Hold Boba
Strain Cooked Boba
Add Strained Boba to Simple Syrup
Spoon 1/4 cup Boba into Glass


Use a Pretty Glass 

Cooled Ginger Tea, Boba, Milk

Pour Glass Half Full of Ginger Tea

Pour Equal Amount of Milk


Enjoy Sipping with a Fat Straw!


Thursday, May 29, 2014

Coconut Basil Paletas


Coconut Basil Paletas Ingredients

I recently had a trip to an uptown shop, where I had my pick of almost any flavor of gelato.  I must have caught a fever, because I decided to forgo my natural choice, my most-loved chocolate.  Instead, I chose, *gasp*, coconut basil gelato.  Deep, rich chocolate will remain my first true love, but coconut basil is more than just a fling!  Shhhh!  Don't tell Ghirardelli!

With weak knees and palpitating heart (remember, I just fell for a new flavor) I knew I must replicate it in my favorite form, the paleta.  My best guess at how to make this flavor was thrillingly delicious, combining the nutty sweetness of coconut with a zing of freshly picked basil!

Coconut Basil Paletas Recipe
Original Recipe by Cindy Best

2 cans coconut milk (not low fat)
1/2 cup sugar
1/2 cup sweetened coconut
15-20 fresh basil leaves
Heat 1 can of coconut milk on low in pan on stovetop, add sugar and stir until sugar is dissolved.  Pour mixture into food processor, add the second can of coconut milk and basil leaves.  Pulse until basil is in very small bits.  Add coconut and pulse 3-5 times to stir.  Pour mixture into molds.  Freeze for 30-45 minutes, add sticks, freeze 6 hours of overnight.  This pop, though appearing milky, is actually an ice paleta, as most that are fruit based.

Heat 1 Can Coconut Milk and Sugar
Add Heated Mixture, Second Can Coconut Milk and Basil
to Processor and Pulse

Add Coconut and Pulse
Pour Into Molds
Cool and Nutty, Sweet with a Zing of Freshness